|
<< Click to Display Table of Contents >> Admin configuration > LDAP integration > Virola server connection > Directory server configuration |
Directory server options
In Directory Server Options tab you can specify configuration of your directory server and map fields of your directory server and Virola. To start configuration on this tab you need to configure and start your Virola server first. It can be done wither through command line on your Linux server or through special server GUI on Windows server.
Directory server
On the directory server tab you need to configure connection settings to your directory server and search parameters for users identification.

Directory server configuration
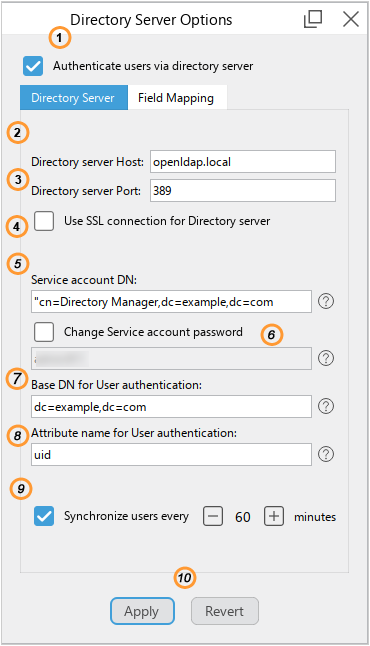
1.Activate "Authenticate users via directory server" option if you would like to connect it with your Virola.
2.Specify your directory server host here.
3.Directory server port can be set to 636 for secure connection and 389 for plain connection. For Microsoft AD and Azure AD secure connection is compulsory.
4.Check this box if you use secure connection for your directory service.
5.Service Account DN is Distinguished Name of the user with extended rights in the directory service. This user will be used to bind with directory server, run search and synchronization.
6.Change Service Account Password check this box and enter the password to your directory service account.
7.Base DN for user authentication is the path to the OU (Organizational Unit) where users you want to add to Virola contacts are located, i.e. this is the directory where user search will be performed and which will be synchronized with Virola.
8.Attribute name for user authentication is the name of the unique attribute which is used to authenticate users in Virola client and identify them in Active Directory. For Active Directory it looks like userPrincipalName
9.Synchronize users every XX minutes is the time period for running synchronizations with Active Directory. If you do not update users in your directory server, then you can deactivate this option right after the first successful synchronization.
10.Use buttons "Apply" and "Revert" to apply or revert changes you made in the configuration settings.