|
<< Click to Display Table of Contents >> Admin configuration > User self-registration > Admin settings |
General
With the help of user self-registration feature users can create profiles and specify their user name and password directly from Virola client. To activate self-registration for users you need to do the following:
1.Log into Virola client with admin credentials
3.Follow Administration / User Self-registration menu
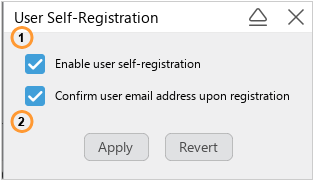
4.Activate self-registration options
5.Apply changes
How user self-registration works
The following self-registration options are available for user self-registration:

User self-registration options
1.Enable user self-registration. When this option is activated, users will get access to the self-registration wizard after starting the Virola client, where they will need to enter:
a.Your Virola server host
b.Your Virola server port
c.Desirable user name
d.Desirable user password
2.Confirm user email address upon registration. If you activate this option your users will enter their email and receive there a confirmation code. This option can be useful if you need to verify your user's email.